
We spent a ridiculous number of hours researching manufacturers and then designing our kitchen. Overall, I found it pretty fun but there’s a bewildering number of decisions to be made. This post’s all about why we chose our kitchen manufacturer and how we planned out the design. It should be helpful if you’re getting a new kitchen soon, particularly if you buy from DIY Kitchens.
Choosing a kitchen manufacturer
After much deliberation, we decided to order from DIY Kitchens because they came highly recommended and are far cheaper than other kitchen suppliers. The main reason they’re more affordable than competitors is that, as the name suggests, the onus is on you as the customer to plan and order your own kitchen so whilst the staff at DIY Kitchens are really helpful, it’s ultimately down to you when it comes to the design and ordering units. This might immediately put some people off and that’s fair enough – we were willing to put the time in to save a few bob without having to compromise on quality.
We ordered a total of 20 kitchen + utility units and it came to £4,300 (not including any appliances, worktop, sink etc.) If you’ve not ordered a kitchen before this may sound a lot, but it was 30-50% cheaper than the quotes we had from Wren and a local independent firm. Initially, I thought DIY Kitchens’ lower prices would mean lower quality but we’re well pleased with how robustly everything is built.
Another factor that led to us choosing DIY Kitchens was the huge variety of units on offer. Initially, this was a tad daunting but we soon felt fairly confident and it meant that we could design our kitchen exactly how we wanted to. We found that during appointments with other suppliers there was a lot of “oh no we don’t do those in that size” sort of responses to our questions which was frustrating, especially when you’re shelling out so much dosh. DIY Kitchens has a far wider range of units so if they don’t have what you want it’s probably time to get your toolbox out and make the kitchen yourself!
One aspect of buying from DIY Kitchens that will put some people off is that they don’t offer a fitting service. This wasn’t a problem for us as I fitted our kitchen, but the convenience of having fitting rolled into your kitchen purchase will be a big plus for some. If I were to pay for fitting, I would personally use a local fitter anyway. A lot of kitchen manufacturers make a big chunk of their margin from fitting (Wren quoted us £3.5K to fit their kitchen!!!) whilst local outfits are typically much more reasonable.
Getting inspired
I would definitely recommend visiting a few kitchen showrooms before doing anything else. We found it really helpful for inspiration and took approx. 392 photos at each showroom. If you’re considering ordering from DIY Kitchens, a visit to their showroom is a must, although there’s only one and it’s in Pontefract so not ideal if you’re hours away but potentially still worth it to save a few grand. As well as inspiration, visiting DIY Kitchens helped us choose the style and colour. There are loads of different styles from modern handleless designs to more traditional, shaker-style options. We’ve gone somewhere in the middle – Clayton shaker in Dove Grey for the L-shaped units of the kitchen with an island in Carbon.
Another great place for inspiration is Pinterest. It’s pretty much exclusively aspirational stuff that only the rich can afford but regardless, it’s great for giving you ideas on kitchen layout, colours, unit types etc.
Design appointments
With a decent idea of what we were after, we found it really helpful to have a couple of design meetings with kitchen manufacturers. Even though we didn’t end up using them, the advice and ideas they provided were invaluable. It meant that when it came to designing with DIY Kitchens we knew pretty much exactly what we were after. Granted, spending a couple of hours with a kitchen designer and then not using them must be frustrating for those businesses, but the way I see it they’ve not given me a strong enough reason to buy from them and that’s not my fault!
DIY Kitchens’ product range
If, like me, you’ve never bought a kitchen before, you will probably be baffled by the breadth of units that you can buy. DIY Kitchens has a particularly wide product range which at first can be a tad daunting but it’s ultimately a good thing as it means you’re unlikely to have to compromise on anything.
To make the most of the variety of units available, I spent aaaages plodding through every product on their website so that when it came to deciding on a final design, we’d have the best combination of units to suit our needs. Whilst this wasn’t overly fun, it was very worthwhile and I’d really recommend doing this if you end up ordering from these guys.
This is probably a good time to familiarise yourself with all the kitchen lingo too. For example, I had absolutely no idea what plinths, pelmets, cornices, drawerline units, fillers, end panels etc. were before I started the process but the advice guides were great for getting clued up on this stuff.
Planning
The space
Before getting too excited and throwing wine racks all over the place, measuring the space VERY accurately before you start planning is key. You’re far better off ordering units that add up to 5cm or so less wide than the space than them being 1cm wider as you can use fillers to neatly hide any gaps whereas you can’t make the units any narrower. When you do come to planning out your units, remember to factor in the width of end panels (the panels the tidy up the end of a kitchen run) and fillers (that, for example, you might use either side of a range cooker or non-integrated dishwasher). They’re only around 18mm each, but they add up.
Providing your kitchen ceilings aren’t stupidly low, unit height shouldn’t be an issue. If you choose any tall units (like integrated fridge freezer or larder unit), the standard height unit is 212cm in total (197cm unit + 15cm feet) which should line up with the top of any wall units you go for. There are some taller units available, but tbh you’d have to either be 7ft tall or use a stepladder to get to the top of these. Here’s a diagram I did which helped me understand the height of tall units and how base + wall units line up with them based on a 40mm deep worktop.

Anything irregular also needs to be factored in. For example, there’s a 66cm wide pillar that protrudes 13cm from the wall half way down the main wall of our kitchen. Whilst we have units up against the pillar, they’re just basic units with shelves because anything fancier (eg: drawers, fancy mechanisms) wouldn’t work because I had to cut out the back of the units when fitting – you can’t cut out anything with a mechanism. It’s worth noting that altering the units to fit round something like our pillar is a faff and took me hours so chances are fitters would hate this.

As well as considering irregularities like pillars, taking into account how your kitchen will flow is vital. A quick Google search and you’ll come across loads of articles about ‘the triangle’ which advises that the sink, fridge, and cooker should be positioned in a triangle so they can easily be moved between. We’ve gone a bit maverick and avoided positioning these three elements in a triangle because we didn’t want the sink or hob on the island, but I do think it’d be a good thing to stick to if it suits your kitchen space.
In terms of spacing, the ideal width of kitchen walkways is between 90 and 100cm. It’s possible to go slightly smaller but it’ll start getting tricky for 2 people to pass each other and you may not be able to, for example, walk past the dishwasher when it’s open. Some people go bigger than one metre but there surely comes a point where it’s actually a bit inconvenient to have to get from one side of your kitchen to the other. We’ve gone for a 1 metre gap all around our kitchen units which is just about right IMO.
Planning tool
By this point you should be fairly well-equipped to get cracking with planning. As I mentioned, with DIY Kitchens the onus is on you to get the planning right so it’s worth spending a decent chunk of time on otherwise you could make costly mistakes. The customer services people are really helpful with answering even very specific questions and I made the most of that!
The best starting point for planning is DIY Kitchens’ planning tool. This allows you to create a virtual space to the exact dimensions of your kitchen. There’s a bird’s eye view function that can be used for selecting and positioning units and then a 3D virtual view that allows you to move around the space to get a better idea of how things look and the flow of the space. It’s pretty much just Sims with the main difference being that this is a productive use of time.
There’s a lot of trial and error but that’s fine as you can easily swap in and swap out different units until you arrive at a combination that you’re happy with. Something that worked well for us was to write down all the bits we had in our kitchen and then plan where we’d put these in our new kitchen, considering any other bits we may need in the future.
When using the planning tool, there are a few options including whether you want soft close drawer runners and what side you want the hinge. Soft close is a no brainer IMO. As for hinge side, we positioned them so that all units would open for access from the range cooker which is in the middle of the kitchen run. So basically, you’re never having to walk around an open door to have to grab stuff.
More planning…
It’d probably be absolutely fine to finalise your kitchen design on the planning tool and then order based on that list of units. I was keen to do a double check of everything and found that planning out all the units on a spreadsheet worked well.
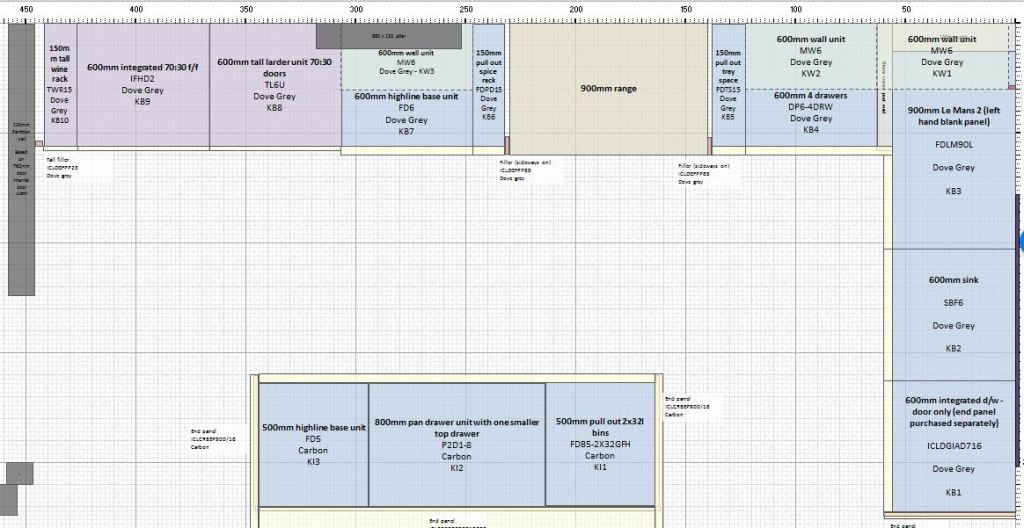
One of the main benefits of planning out on a spreadsheet is that it gives you 100% flexibility. The planning tool is really good, but it can sometimes make assumptions that aren’t right. For example, when we added our island to the planning tool, the end panels weren’t selected in the right place so by using the spready I was able to adjust that.
After planning out our kitchen, I put together an order list with details like dimensions, hinge side, colour etc. to make sure that when it came to actually ordering I felt confident about not making mistakes. This may seem a little OTT, but I’d rather spend another couple of hours prepping than get the order wrong.

DIY Kitchens don’t leave the risk of ordering the wrong stuff exclusively with you. They’ll contact you after you’ve ordered if there’s anything in your order that they think doesn’t look right which is a handy safety net.
Cutting costs
Whilst DIY Kitchens came out a lot cheaper than competitors, it’s still a big purchase and some savvy planning can easily save a few hundred quid, maybe even over a grand.
The first tip is that, as a general rule, anything with a mechanism is more expensive. We saved some money by getting as few drawers a we need and trying to avoid the expensive, but very tempting fancier bits of kit. Having said that, we couldn’t say no to the Le Mans 2 corner unit which is pretty damn sexy.

If you have a couple of wall units next to each other, it’ll likely save you a few quid to get one large unit with double doors than two separate units. We’ve got a 90cm wide double wall unit in the utility which was a lot cheap than getting two single units that added up to 90cm.
After deciding on your units, you can choose the trim that will finish it off. The plinth is the section that sits at the bottom of the units to hide legs, the pelmet is the section that you attach to the underside of wall units and cornice is the stuff that sits on top of wall and tall units. Whilst plinth is a must, you don’t actually have to buy pelmet or cornice. In our opinion, kitchens without these look a bit unfinished but that’s purely personal preference and by leaving these out we’d have saved a decent amount.
Another cost-cutting option is to buy these elements of trim (fillers and end panels included) in carcase material rather than door material. This basically means that they’re made of the material used to build the units rather than the doors. It’s therefore slightly different wood and is colour-matched to the door material rather than being an exact match. For some kitchen ranges and colours, such as our Dove Grey Clayton units, the carcase bits of trim are a very close colour match whereas the Carbon colour of our island units is clearly a different colour to the equivalent carcase material. Like all of these decisions, it’s totally subjective, but if you’re on a tight budget this is another way of reducing your outlay.
Whilst you definitely need end panels to finish off, for example, the side of an integrated dishwasher, there are scenarios where you don’t necessarily need to shell out. Our extractor hood has wall units to either side of it which we could have bought end panels for. However, because the carcase material is a really good match for the door material of a Dove Grey Clayton kitchen, we’ve not actually bothered with end panels and it looks great.
A final tip for y’all: buying non-integrated appliances will save you money. Firstly, the appliance itself will likely be cheaper than an integrated equivalent (and, in the case of fridge freezers, will be more spacious), but it’ll also mean you don’t have to buy any units the house the appliance. We’ve gone for integrated appliances in the kitchen because we don’t like the look of non-integrated, but it’s cost us a few hundred quid more. However, don’t assume all integrated appliances will cost more – our integrated dishwasher was pretty cheap and only required us to add a DIY Kitchens door to the front of it.
I hope y’all found this post helpful. You may be interested in having a peek at other posts like how I fitted our kitchen, what we got up to in 2020 or how much our extension cost.

Leave a comment